![]()
D-Star Reflector Linking
The purpose of this
training aid is to help you understand linking and unlinking D-Star Reflectors.

![]()
Click Here for a Pre-Quiz Click Here to Return Home Click Here for Final Quiz
Assumptions
This
training aid article assumes you have a D-STAR radio and you know how to use the
PC program software or radio button entries to program it.
If
not you can still learn a lot about D-STAR Reflectors here but may need someone
to help you program your radio. Programming all of your choices into memory
locations for the repeaters and Reflectors can be very time consuming and
tedious. See
Appendix A.
Programming refresher
If
you’ve managed to program your D-STAR radio already you should be familiar with
the format of programming the four key fields, MYCALL, URCALL, RPT1 and RPT2.
Programming a D-Star radio requires these fields to be programmed either by
manual entry for each use or stored in memory for recall.
You
might think of these fields like an "address
label" on a package to
be shipped to another location.
(MYCALL) is the callsign of the station you are using. This will be your
callsign in most cases.
This is
the “From:” address.
(URCALL) is the callsign of the recipient station and can be one of four things.
This is the “To:” address.
1.
CQCQCQ
2.
The callsign of an individual
station you are contacting.
3.
The callsign of a D-Star
repeater you are contacting
4.
The Reflector you are linking
(RPT1) is the D-Star repeater you are using when not in the simplex mode. This
will, in most cases, be the closest repeater to your location.
This is
like the carrier "drop box"; USPS, UPS, FedEx etc.
(RPT2) is the D-Star Gateway to the Internet.
This is
how a long distance package is sent. It is similar to using “Overnight” or
“Airmail” (no pun
intended).
Note:
The examples used in this lesson are for
those registered with the KE5RCS D-Star repeaters in Walburg, TX. If you are in
some other area of the country please adjust the callsigns accordingly.
What are
D-Star Reflectors?
The
D-Star
Reflectors
are a means to set up a conference bridge for D-Star Users. They allow multiple
D-Star repeaters and DV Dongle users, from all around the world, to be joined
together in one big conference call and whatever information is transmitted from
one of the users is repeated across all of the connected repeaters that are
linked to the Reflector; a true worldwide conference call. Everyone connected
will be part of the conversation; well at least be able to listen in.
There
was a World Wide Net set up and the objective was to see how many D-STAR Nodes
and DV Dongle Users could connect to a D-STAR Reflector and to gauge what sort of
capacity it could take. There were 28 D-STAR Nodes (repeaters) and 18 DV Dongle
users connected. The system performed perfectly, and no performance issues were
noted.
Who
sets up Reflector Linking?
It
can be automatically enabled by the local software or by the Amateur Radio
Operator. The local administrator of the D-STAR Gateway is responsible for the
programming and management of the D-Star system and is directed by the owner’s
policies for the repeater stack and gateway.
There
are many local policies in place at the various locations around the world but
in general you may or may not have permission to link to a D-Star Reflector.
Some repeater owners will have auto-linking or unlinking set by their policy
base on the local needs. It is solely the option of the local repeater owners.
However, the
Reflectors
are there to be used so they will accept all valid links.
Auto-Linking
D-Star Reflectors
Auto-linking is where the local administrator has set up parameters within the
DPLUS software located on the Gateway computer to monitor connections and act
accordingly. This includes auto-link, unlink, and prohibit linking.
Note: While some repeater administrators will NOT enable user control of linking
to the Reflectors, as of 9/01/2011, HOTERA has this following policy in effect
for the KE5RCS D-Star repeaters.
KE5RCS D-Star
A-B-C, Walburg, TX
Module (A) 23cm will not be auto-linked to any Reflector and will be primarily
used for local testing and EmComm use.
Module (B) 70cm will be auto-linked to Reflector 4B all the time (27/7) and will
be re-linked when it has been idle for 15 minutes if someone has unlinked it.
This is the Texas Permalink Repeaters Reflector.
Module (C) 2m will not be auto-linked to any Reflector and will be disconnected
from any Reflector after 15 minutes of non-use if someone forgets to unlink it.
Common courtesy asks that if you link it, please unlink it when done.
Here
in Texas when you are traveling any place outside of this local coverage area
(Georgetown) with your D-Star radio or DV Dongle, and you have access to a repeater that is
auto-linked to Reflector 4B, you can contact someone in your home area that has
a D-Star device also connected to Reflector 4B.
If
you have permission on the accessible repeater that is not linked where you are
traveling, you can link it to Reflector REF004B and have communications back
“home”. Be sure to unlink when finished.
While
you are away (to anywhere in the world), ask your local friends and family to
listen on KE5RCS Module B or Reflector 4B for your CQ.
The key
to using linked connections
All
users need to remember in order to make D-STAR Reflector access work the fields
must be correct especially the RPT2 field has to include a G suffix in the 8th
position.
Example for local users on KE5RCS B to talk on Reflector 4B:
MYCALL: K1LGJ
URCALL: CQCQCQ
RPT1: KE5RCS B
RPT2: KE5RCS G
The
above is the normal operation for wide area communications in Texas since the
Reflector 004B is auto-linked.
This
is the standard for working with the KE5RCS D-Star repeater linked to the Texas
Permalink Repeaters Reflector. Remember you might turn on your radio and not
realize that you are connected up to a D-STAR Reflector, do not be surprised if
you get a reply that you weren't expecting. You will be heard by all RF stations
connected to the D-STAR Reflector and by all stations connected to the linked
D-STAR Reflector via a DV Dongle.
User-Linking
D-Star Reflectors
(See
your manual for the actual steps to take on how to program your radio’s
memories)
To Link:
This
will work any place you are able to access a D-Star repeater. Do not attempt
while driving.
Linking a local D-Star repeater to a D-STAR Reflector requires four pieces of
information in addition to your callsign and Gateway access settings.
1.
The callsign of the local repeater – for example we will use KE5RCS
2.
The local module to link to a Reflector – for example we will use (C)
3.
The identification of the Reflector – for example we will use REF001
4.
The module of the Reflector being linked – for example we will use (C)
Goal:
Link to REF001 C from KE5RCS C
MYCALL: K1LGJ
URCALL: REF001CL (make sure C is in position 7 & L is in position 8)
RPT1: KE5RCS C
RPT2: KE5RCS G
The L
in URCALL is what tells the software that this is a linking operation. By
pressing PTT this links your D-STAR Node to D-STAR Reflector #001, Module C.
Substituting the C (REF001CL)
with an A or B changes modules. And if you substitute the 001 with another
number you can change to a different Reflector.
After
your conversation is completed you should (by courtesy) unlink from the
Reflector.
To Unlink:
This
will work any place you are able to access a D-Star repeater. Do not attempt
while driving.
Un-linking a local D-Star repeater from a D-STAR Reflector requires two pieces
of information.
1.
The callsign of the local repeater – for example we will use KE5RCS
2.
The local module to unlink from a Reflector – for example we will use module (C)
MYCALL: K1LGJ
URCALL: *******U
Make sure the * are 7 spaces & the U is in the 8th position.
RPT1: KE5RCS C
RPT2: KE5RCS G
This
unlinks the KE5RCS D-STAR repeater module (C) from the Reflector. So you only
need one memory location (per module) in your radio to unlink any D-STAR
Reflector that’s connected.
Cautions
when linking to a D-Star Reflector
Having a D-STAR repeater linked to a D-STAR Reflector will and does impact all
the local stations connecting to your local D-STAR repeater.
If
the D-STAR repeater is linked to a D-STAR Reflector and there is a local call in
progress via the repeater, the conversation will be heard on all linked D-STAR
repeaters via the D-STAR Reflector.
DV
Dongle users who directly connect to the D-STAR repeater via the
D-STAR Gateway will be heard by users on the repeater but not the Reflectors.
You
should ask the DV Dongle users to connect directly to the D-STAR Reflector; this
will enable all users that may be monitoring to hear both sides of the
conversation. It’s quite frustrating to listen to only one side of a
conversation. Similarly, please make sure that all users on RF have set their
RPT2 set to their local Gateway.
Specific
training for local users
If
you plan to regularly use multiple D-STAR Reflectors (one at a time) it is
suggested that you input all the D-STAR Reflectors you will use (including the
modules) into your radio’s memories, so all you need to do is dial it up and
link to the desired D-STAR Reflector/Module.
Sounds easy but consider this. Each memory location is used to store the
settings for a single Reflector/Module combination from a certain
repeater/module combination that you can access from your current location.
Let’s
look at the details:
Scenario 1 – Having access to the Southeastern US D-Star Weather Net
You
would like to link to the D-Star Reflector 002 on module (A), by selecting a
memory location while accessing your local D-Star repeater’s module (C), have a
QSO and then unlink the Reflector.
This
would take 3 memory channels.
1
Reflector x 1 module x 1 repeater x 1 module = 1 entry for linking the Reflector
and then you need 1 entry for your “talk” channel and 1 more to unlink from the
Reflector.
1
MYCALL: K1LGJ URCALL:
REF002AL RPT1: KE5RCS C
RPT2: KE5RCS G
2
MYCALL: K1LGJ URCALL:
CQCQCQ
RPT1: KE5RCS C RPT2: KE5RCS G
3
MYCALL: K1LGJ URCALL:
U RPT1: KE5RCS C
RPT2: KE5RCS G
Scenario 2 - Complex
You
need options to link to two different Reflectors, using their module (B) and be
able to access either of them from two different repeaters in the area on the
selected local repeater’s module (C). This can be done by selecting a memory
location to recall the settings, depending on where you are driving at the time.
This
requires 8 memory channels.
2
Reflectors x 1 module x 2 repeaters x 1 module = 4 different entries for the
Reflectors and then you need 2 entries for your “talk” channels (one for each
repeater) and 2 more to unlink the accessed Reflectors.
1
MYCALL: K1LGJ URCALL:
REF001CL RPT1: KE5RCS C
RPT2: KE5RCS G
2
MYCALL: K1LGJ URCALL:
REF001CL RPT1: K5CTX
C RPT2: K5CTX
G
3
MYCALL: K1LGJ URCALL:
REF004BL RPT1: KE5RCS C
RPT2: KE5RCS G
4
MYCALL: K1LGJ URCALL:
REF004BL RPT1: K5CTX
C RPT2: K5CTX
G
5
MYCALL: K1LGJ URCALL:
CQCQCQ
RPT1: KE5RCS C RPT2: KE5RCS G
6
MYCALL: K1LGJ URCALL:
CQCQCQ
RPT1: K5CTX C
RPT2: KE5RCS G
7
MYCALL: K1LGJ URCALL:
U RPT1: KE5RCS C
RPT2: KE5RCS G
8
MYCALL: K1LGJ URCALL:
U RPT1: K5CTX
C RPT2: KE5RCS G
Scenario 3 – Very Complex
A
more complex program is the options of linking to any of three different
Reflectors with each having two active modules (B & C). And there is a need to
link from any of four different repeaters depending on where you are driving at
the time and use either module B or C from the repeater.
This
requires 64 memory channels.
3
Reflectors x 2 modules x 4 repeaters x 2 modules = 48 different entries for
linking Reflectors and then you still need 8 entries for your “talk” frequency
(4 repeaters x 2 modules) and 8 entries to unlink from the linked Reflectors.
Scenario 4 – Do you really need it?
OK,
since you are a constant traveler in the great state of Texas, you are ready to
program all the Texas D-Star repeaters and modules to 5 or more of your favorite
D-Star Reflectors and their modules – whew!! Just the math is boggling.
I
believe it is best to put a few local connections in memory and leave the rest
to “on the fly” programming when needed. This is why you should practice linking
and unlinking Reflectors from your radio or mic buttons.
The
other option is to program your radio ahead of time before going on a trip.
How
to know if it is linked
Even
though D-STAR is radio memory hungry, once you have set up all the memories in
your radio (that you care to), select the memory location of the desired D-STAR
Reflector and module you want to link to from your location and press the PTT
button for 2 seconds and release.
You
will hear a voice announcement saying “Remote System Linked” to indicate you've
been successful. Or if you are unlinking the massage will say “Remote System
Unlinked”.
A
local repeater can be linked to three Reflector/modules all at the same
time using each of the local modules A, B and C.
Note: You
cannot have 2 D-Star repeater/modules on different ports (A, B or C) from the
same location, linked to the same D-Star Reflector on a single Port at the same
time.
KE5RCS B and KE5RCS C cannot be linked to REF003 B at the same time.
Very important
for good radio manners!
Once
you have linked or unlinked a D-STAR Reflector, do not stay on that memory
setting as it is only used to link or unlink the D-STAR Reflector.
If
you stay on this memory setting, every time you press the PTT you will hear a
message “Link Currently Established” or
“Remote System Unlinked”. This can become annoying during a conversation
To
transmit once the Reflector is linked, be sure to go to whichever memory setting
you have set for communications on that repeater and module. In our example it
is KE5RCS C and ensuring that RPT2 has KE5RCS G set, the URCALL field can be set
to CQCQCQ.
This
sequence below shows the correctly managed steps to a good QSO via a Reflector.
·
Current Local conversation
M101
MYCALL: K1LGJ URCALL:
CQCQCQ
RPT1: KE5RCS C RPT2: KE5RCS G
PTT
M101
MYCALL: K1LGJ URCALL:
CQCQCQ
RPT1: KE5RCS C RPT2: KE5RCS G
PTT
·
Linking to a Reflector
M100
MYCALL: K1LGJ URCALL:
REF001CL RPT1: KE5RCS C
RPT2: KE5RCS G
PTT
“Remote System Linked”
·
Linked conversation
M101
MYCALL: K1LGJ URCALL:
CQCQCQ
RPT1: KE5RCS C RPT2: KE5RCS G
PTT
.
.
.
PTT
·
Unlinking
M102
MYCALL: K1LGJ URCALL:
U RPT1: KE5RCS C
RPT2: KE5RCS G
“Remote System Unlinked”
·
Back to local communications
M101
MYCALL: K1LGJ URCALL:
CQCQCQ
RPT1: KE5RCS C RPT2: KE5RCS G
PTT
.
.
Notice three different memory locations (M100, M101 and M102) where used in the above
sequence.
Appendix
A
Be
prepared for a lot of data entry when setting up you memory locations.
This
screen below is for the ICOM ID-880H. Your radio programming screen may be
different but the concept is the same.

The
figure (above) shows the memory channels starting at #100 and this is where I
choose to
enter the programming data. Notice it has both FM settings for regular radio use
and the additional D-Star settings.
Just
programming the UR, RPT1 and RPT2 is not enough. The local frequencies and
relative information is also needed so you can transmit and receive the
communications.
Appendix B
Suggested links for more information.
D-Star Info:
http://www.dstarinfo.com/
Reflectors:
http://www.dstarinfo.com/reflectors.aspx
Repeaters:
http://www.dstarinfo.com/standard-repeater-list.aspx
D-Star Users:
http://www.dstarusers.org/
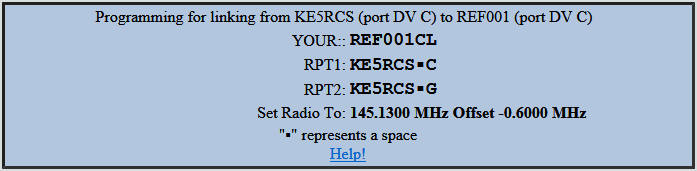
Appendix C
This
is a very good place to see what the settings are to link to a given Reflector.
This is a Java applet and will refresh each time you make a change to the data
in the boxes. The screen shot in the figure below shows the results of the
choices made.
http://www.dstarinfo.com/dstar-web-calculator.aspx

The
information in this training aid is presented in the spirit of HAM radio
camaraderie and is by no means meant to be the final word. You are free to copy
and use this document as long as you give credit to HOTERA.org.
The
process of updating is endless; if you find errors or would like to make
suggestions for improvements to this document, it will be well received. The
HOTERA board wants to have the most accurate and current data available to our
Amateur Radio Operator community.
Please contact us through the webmaster and administrator at
All
comments are welcome!
Thank
You